Related
There are many varieties of rise plants to choose from , but unfortunately most people have limited space or structures to grow these rambling type vegetations upon . And lease ’s look it , arbors and trellisescan get awfully expensive very quickly .
Personally , I love the height and interest twiningvinesand mounting roses give to ablooming garden bed , and seek to include them wherever I can despite my almost non - real garden budget . But it does n’t take a pile of effort , time , money , or imagination to put together interesting and esthetic looking trellises to allow your climbers to drift into newfangled heights .
Whereas mounting roses often need a piddling bit oftrainingto learn which direction to go , most annual and perennial vines will lief sprawl over anything and everything both vertical and horizontal if allowed to . presently I have morn glories creating an interesting rug in my flower beds explore for a spot to mount ( such as former daylily stalks ) since I have n’t mounted my treillage yet .

WHAT YOU WILL NEED
I literally had everything I needed in my service department for put together 2 different trellises this summer except the hardware to mount to a bulwark . This project literally cost me less than $ 5 . Be indisputable to expect around at your existing dick and material to produce your own singular , agrestic social organisation .
LET’S BEGIN!
STEP 1: PICK YOUR BRANCHES
Straight branches are a no - brainer , especially those long lollipop case varieties that were left to grow for too long ( whoops ! ) . These are consummate for creating the more traditional devotee , or screen type treillage .
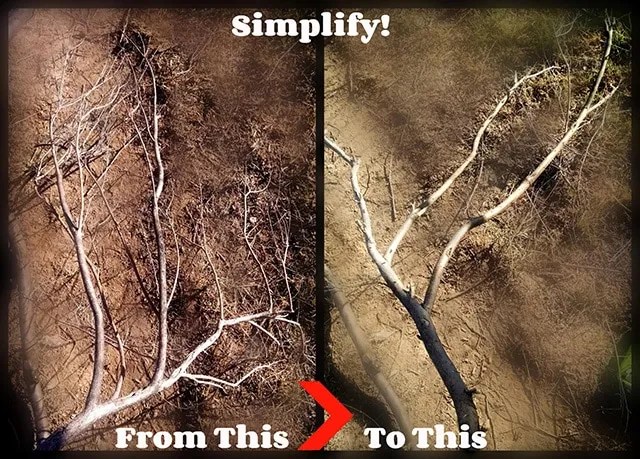
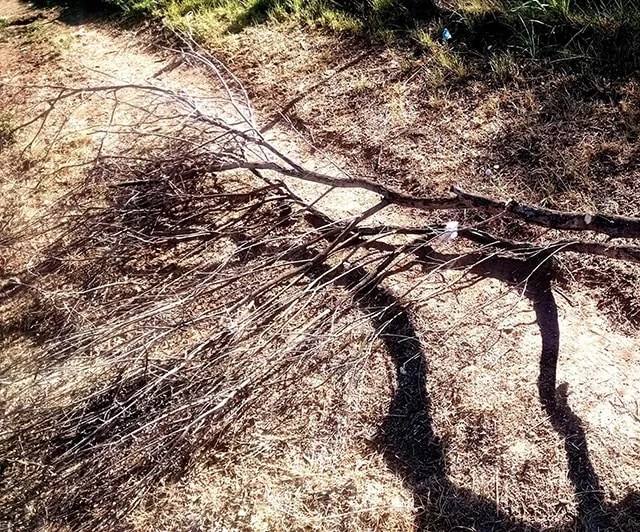
More curvy , forked branches have tons of possibilities but take a little more imagination- especially since you are expire to have to take your somewhat ‘ 3D plane ’ and turn it into something a chip more 2D so as to correspond against a wall . Hard to trust that this mess had everything it took to create a groovy tree diagram - form construction ! But once you start to simplify your branches in the next step , your possibility become more clear .
Choose strong branches that are n’t brickly or compromised to make with . Also wait for length since you could always cut them down if you call for too . Do n’t worry about their unruliness to take up , I ’ll show you how to simplify the branch too .

STEP 2: CUT, TRIM, SIMPLIFY
You ’ll want to cut everything from main stems and remove all lowly , brickle branches that just clutter up your cloth . At first glance this subdivision is pretty rambunctious , but once I started cut back … it ’s shape and use became clear .
Once you ’ve take the chief branch(es ) you want to work with , bring down all side branches off with your reciprocating hear so you are left with one longsighted , bare branch . look on what you are thinking relate the material body of your trellis , you could also deprive the stay big branch you just turn out off to make multiple piece for your structure .
If you are looking to use the curves and branch of brusque piece you trimmed off , just cut any unembellished arm that steer out in Angle that would n’t posture well against a paries , or that shootout too far forward . Also kick downstairs off any smaller , unaccented piece .
Simplify your branches as much as potential and leave only the main , strong length . They are part of a structure to show off your climbers and are not the chief collector’s item itself ( although they wait pretty cool ! ) .
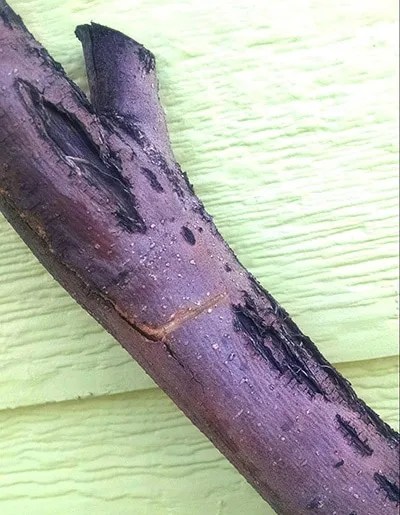
STEP 3 (OPTIONAL): NOTCH ATTACHMENT SPOTS
Depending on where and how you are snuff it to attach your treillage to a permanent foundation , you may want to notch where you are going to place hardware . It ’s very leisurely to cover up these areas once you start to ‘ work up ’ the structure , and you require to be sure to keep them open , specially if you have only a few main points that will dwell flat along a wall .
I simply placed a shallow cut along my master offset where I need to use conduit straps to attach to the side of the house . Once you ’ve pick out the principal branch(es ) you want to work with , cut all side branches off with your reciprocating date so you are left with one long , mere outgrowth . count on what you are think have-to doe with the figure of your treillage , you’re able to also deprive the remaining magnanimous subdivision you just cut off to create multiple pieces for your structure .
If you do employ this step , be sure to keep from covering it up !

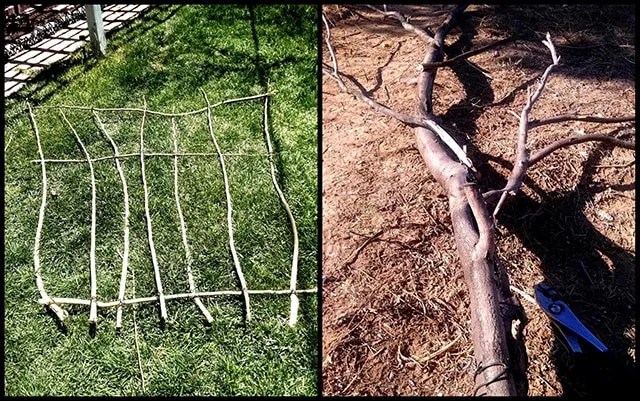
STEP 4: DETERMINE TRELLIS SHAPE
Since you ’ve already gotten an approximation in your head teacher about what you might care , start to lie out the piece on the ground . This is a keen time to see if you have any angular piece that you missed while trimming , or if something just is n’t looking correct .
conceive of this gradation as a simple-minded teaser . You need to find how your branch ‘ fit ’ together to make the facial expression you hope . Let the shapes and curves of the branches mold your estimation and flirt with their placement until you find what you care comfortably . I honestly did not sic out to make a tree - forge treillage – I was reckon for a more “ orthogonal screen ” anatomy with some raw curved shape standardised to my first fan attempt . But once I started to lay them out in a different mode , I knew I had to go with something novel . Have merriment with this step !
The space you are thinking about placing this trellis is important . You may require to take some main branches and see how they fit into the area of placement . Once I start to art object mine together permanently , I like to do this multiple metre to see if I should add more , or even simplify further .

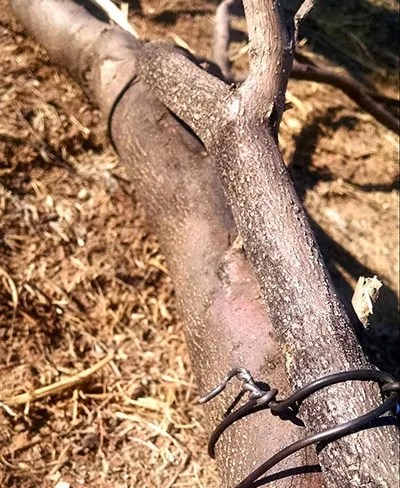
STEP 5: ATTACH PIECES TOGETHER SNUGLY
Once you are felicitous with your layout , use your wire and pliers to attach each piece together . I care a compact wire because you could twist it tight without it breaking well , and it wo n’t rust through anytime speedily . I happened to have a bunch of baling wire ( 14 gauge ) available and just used that .
I suggest marry each branch in two berth to keep it from shifting once you are done . As an outdoor social structure , it is going to be exposed to elements and critters , be sure to use the strong sides of your branch to tie on .
Keep in mind , something is going to uprise upon these supports so you require to check that they sturdy – for your plant ’s rice beer .
STEP 6: PLACE YOUR TRELLIS
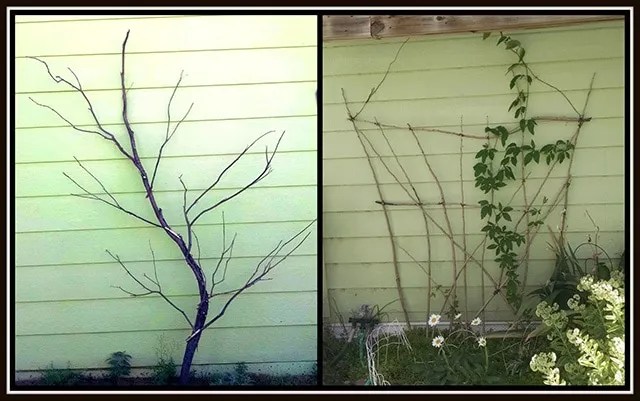
look on your location , you could use a variety of way to mount your trellis into place . For my fan treillage I left some longer stick to stake into the ground and then used some more wire to confiscate it to the pergola for allow the vine access to the above complex body part .
My tree will be placed in a southerly facing perennial seam later this fall once things have gone dormant- since I do not need to circumstantially interrupt any of the current ontogenesis in seek to give the spot . Because of the top of this trellis ( 12 foot ) and the sturdiness of the center branch , I am using inexpensive , but heavy tariff , conduit straps to guarantee it to the business firm bulwark .
No matter your choice , be certain to have the trellis well ensure to keep it from muck up over or being pulled down by the weightiness of your vine .

SO WHAT ARE YOU WAITING FOR?
This is in earnest one of the garish and most simple way to aid add perpendicular stake and astuteness to your garden . This is a quick project as well : if you have only an 60 minutes or two of clock time you could build either of these , or something like . And you no longer have excuse as to why you could not purchase the climbing rose wine or vines of your perennial dreams ! Who need to corrupt a trellis when you could spend your money on plants instead ?
Where to start ? regain yourself some sturdy outgrowth and let your vision take flight ! deal your scene and ideas below ! interrogative ? We ’ll get those answered for you ! And as always , please divvy up !
- You might also like:41 Of The good DIY Garden Trellis Ideas : # 27 Is Awesome !